Ever been annoyed by the same ads playing over and over again? Or by the same company sending you multiple emails over a short period of time despite you ignoring their first attempt?
This rise in frustration happens when an organization reaches out to their contacts without giving them a break or time to react to the first message.
With Journey Builder flow control activities, you can leave a little breathing room between messages in your customer journeys — thus improving your relationship with your contacts. But what is a Journey Builder flow control activity?
Download our Salesforce Marketing Cloud Journey Builder: The Essential Guide to maximize your marketing automation platform.
Journey Builder flow control activities allow you to optimize an individual contact’s experience of the entire journey based on their level of engagement and logic. They also dictate how a contact moves through your journey before exiting.
Flow controls consist of a few different activity types:
Flow controls are considered a type of Journey Builder activity. If you’re interested in learning more about the other Journey Builder activities, you can learn more in the previous chapter about Journey Builder activities.
Waits pause your contacts for a set amount of time before moving onto the next activity. Sending any type of message should always be followed by some type of wait activity in order to give contacts sufficient time to engage and to give Journey Builder a chance to measure the engagement.
There are a few different types of wait activities:
Keep in mind that contacts are evaluated daily during the waiting period to see if they meet your goal or not. In Journey Builder, goals are actions you want your contacts to take within the journey. Based on their actions, they may exit the journey before other contacts do.
This is where your exit criteria comes in; an exit criteria determines how and when a contact should drop out of your journey. This may happen right after they meet a goal, or if they stopped indicating interest in continuing on with the journey.
There are 3 types of exit scenarios:
A split in Journey Builder happens when you want to split your contacts into groups and send them off to separate designated paths. There are a few splits you can take advantage of: engagement splits, decision splits, random splits, frequency splits, and Einstein scoring splits. We’ll discuss frequency splits and Einstein scoring splits later in this chapter.
An engagement split is when you send a contact down a “Yes/No” path based on their behavior prior to the split. To use this split, you must have at least 1 email and a waiting period in the customer journey.
The most common example is looking into whether they’ve opened an email or clicked a link within an email. If they did open an email within a designated time frame, they’ll go down one path (the “Yes” path). Everyone else will go down the other (the “No” path).
For email opens, it’s best practice to wait at least 3 days before sending the contacts through an engagement splits. For clicks, you should wait at least 5 days before utilizing the engagement split.
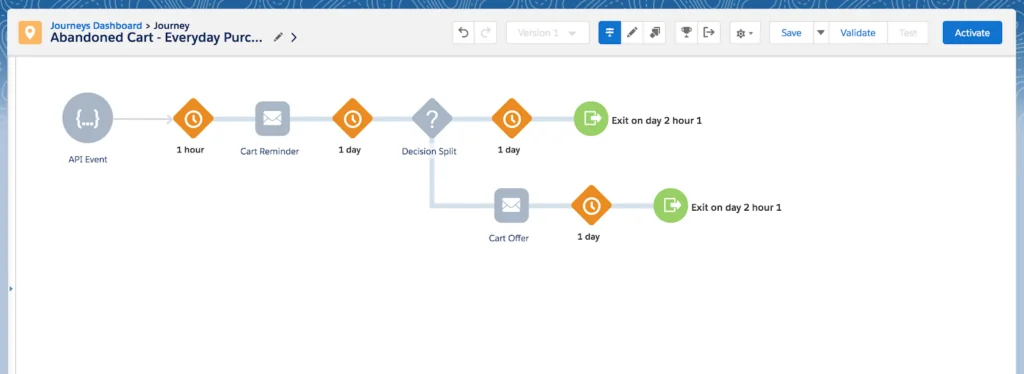
A decision split is used when you’d like to create different paths based on the information you already have on your contacts. This information can be found within the entry source data extension, or information you have in other data extensions inside of Marketing Cloud.
When the journey is running, contacts that undergo a decision split will be evaluated against the different paths to see if they meet any criteria. The paths will be evaluated in a top-bottom sequence, so contacts will be sent to the relevant path based on the first criteria they meet. Those who don’t meet any of the criteria will be sent down the “Remainder” path.
A great example of using a decision split path is when you choose to email people differently based on their last purchase date. Everyone who has purchased within a week will go down one path, those who have purchased within a month will go down another, and the remaining contacts will go through the last path. From there, you can create targeted messaging to attract contacts into buying items from your site.
You can create up to 20 paths. Because you can create so many paths, it’s best practice to use consistent naming conventions. That way, it’ll be easier to visualize exactly how you’re sending your contacts down the decision split.
A random split is when you split contacts into random groups. This is frequently used for A/B testing. When setting up a random split, you can specify the percentage of contacts that go down each path.
You can split your contacts into a maximum of 10 groups that lead to different configurable paths. It’s important to note that random splits don’t choose a winning path automatically for you based on engagement metrics. This is where another activity called the path optimizer comes into play.
The path optimizer activity allows you to test out emails in an A/B environment, then automatically select the best-performing path for subsequent contacts.
You can use a sample of your contacts to test out multiple versions of paths, such as the messaging, wait times, channels, and message frequencies. However, it is best practice to only test out one variable at a time to ensure that you get clear results from the A/B test.
From there, you can tell Journey Builder to pick the winning path based on email metrics tracked — such as emails opened, links clicked, or people unsubscribed. You can also manually pick a path that best aligns with your business goals.
All remaining contacts will then automatically take the winning journey path selected.
If you need to merge split contacts back into one singular path, then you’ll want to use the “Join” activity in Journey Builder. This is most commonly used to join separated paths back into 1 to swiftly exit all remaining contacts.
Einstein flow controls are flow controls that incorporate Marketing Cloud’s machine learning technology, known as Einstein AI. Keep in mind that Einstein features in Marketing Cloud are considered more advanced.
There are 3 different Einstein flow control activities: frequency splits, Einstein scoring splits, and Einstein Send Time Optimization (STO).
You’ll want to use a frequency split when segmenting contacts based on their engagement frequency. Based on their engagement level, you can control timing and messaging for each path created within the frequency split.
Einstein analyzes the optimal number of emails you should send to your contacts based on your subscribers’ previous engagement data. From there, Einstein will separate your contacts into a few segments based on if you’ve oversaturated them with emails or not.
These segments are:
Einstein scoring splits are used to segment customers into logical split paths based on prebuilt Einstein personas: loyalists, window shoppers, selective subscribers, and winbacks/dormant. These personas are built based on the subscribers’ past 90 days of email engagement.
From these personas, you can utilize the Einstein scoring splits by choosing one of these predictive metrics: likelihood to open, likelihood to click, likelihood to stay subscribed to your emails, or likelihood to purchase on your website.
Let’s say you’re not sure when is the best time to send a message to your contacts. You’ll then want to use the Einstein Send Time Optimization (also known as the STO) activity.
Einstein STO allows you to use 90 days of email/push notification engagement data and pairs it with machine learning to figure out the best time to send a message to each contact. This allows you to connect with your contacts on a deeper level based on when they’ll be checking their messaging.
Flow controls can ultimately enhance your customer experience by figuring out when to send your message and who should receive which message. You can also take advantage of Journey Builder’s Einstein machine learning to figure out how to best reach each of your contacts.
As a recap, here are the different flow control activities:
Because Journey Builder is such a robust tool, you’ll want to make sure an experienced Journey Builder is on your team to create meaningful customer journeys. Otherwise, you risk creating convoluted journeys with poor engagement rates because your users haven’t taken into account each activity’s best practices.
If you’re looking for an experienced admin yourself, EBQ’s digital marketers are all certified and have experience in Salesforce Journey Builder. Not only Salesforce Marketing Cloud Journey Builder: The Essential Guide can we run your marketing campaigns on your behalf, we can also create engaging marketing assets to position your brand as a thought leader.
We hope that this Essential Guide to Salesforce Marketing Cloud Journey Builder helped you get a better understanding of how to create effective customer journeys. Now that you know how to create journeys from scratch and the different building blocks Journey Builder offers, it’s time to start building better relationships with your contacts.
Looking for extra guidance? Our certified experts can optimize your Salesforce Marketing Cloud setup and help you boost your return on investment in the platform.
If you’re looking for additional marketing help, you can also work with our digital marketers to run the creative and technical strategies with you. Contact a specialist today to learn more.