Pardot’s Engagement Studio is an evolution of the old drip program function. It’s a dynamic tool that allows you to plan out a multi-touch email campaign based on logic. It even lets you test out scenarios to see how a user could navigate through the path and the length of time needed to complete the journey.
However, being able to make large-scale engagement programs that are compelling and engaging for your prospects can be challenging.
In this section, we break down the complexities of Pardot Engagement Studio to help you optimize your email sequences with Pardot. If done correctly, you can create powerful recurring engagement programs that work in the background and continually fill your B2B sales funnel with high quality leads.
Don’t have time to read the full guide right now? Download the B2B Marketer’s Guide to Pardot to read at your convenience.
Next, you will create your workflow. Create a visual representation of how you want your program to look. This representation will help you once you start building out the program.
Pardot’s intuitive, interactive logic builder helps you to visualize the exact logic of your email marketing campaigns. But if you prefer to start with a pen and paper or a whiteboard, that works too.
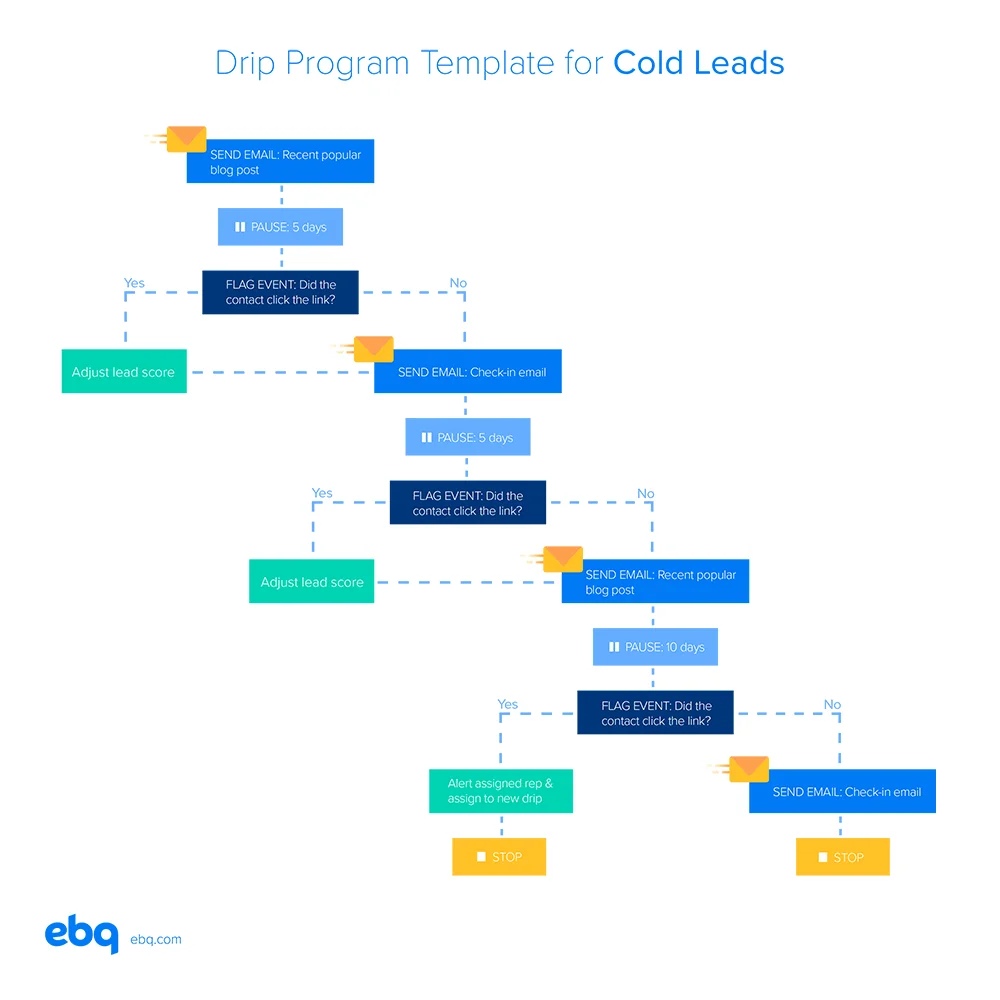
Here are a few tips to consider when working in Pardot Engagement Studio:
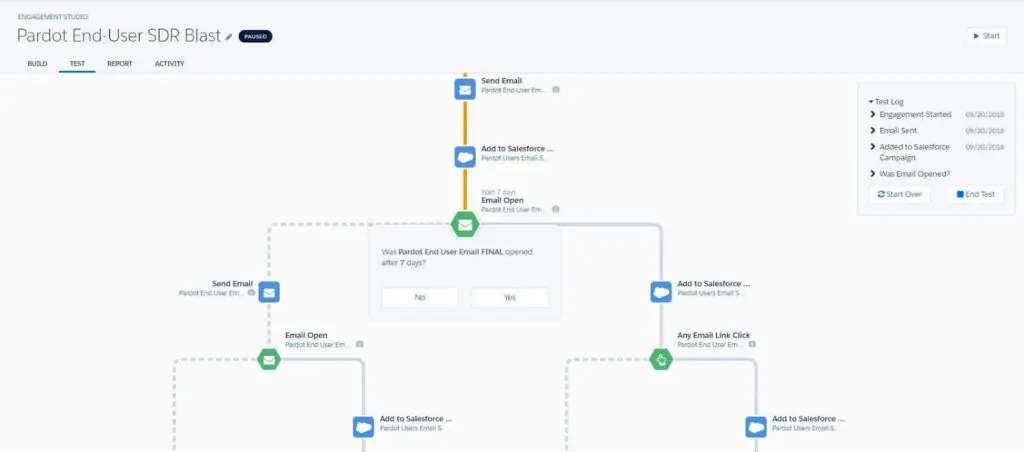
The next phase in your Engagement Studio creation is to test the logic. You can whiteboard the logic with your team, or you can use the native testing tool.
Pardot’s testing tool in Engagement Studio is quite powerful. It allows you to view how the program will work visually, the days your emails will send, and how long your program will last.
One of the most valuable features of the Pardot Engagement Studio is the reporting functionality. The reporting tab gives you real-time insight into how your drips are functioning, what percentage of prospects are progressing down the path, click-through rates, and more.
We use reporting to get real-time feedback on the success of our campaigns. By analyzing the path distribution and success metrics, we can understand how to optimize our programs to reach more prospects.
We’ll discuss reporting on your Pardot campaigns in detail in the final chapter of this guide.
The last and final piece of an effective Engagement Studio automated program is optimization. Once you create the program and leave it running in the background, you should frequently review that the engagement program is running efficiently and engaging your audience.
We recommend that you check on your recurring programs once a week to make sure all systems are running smoothly.
Make sure to audit your email templates in the program too. With multiple people working on various assets, it’s easy to make changes to a template that is currently in use. Fortunately, Pardot gives you a warning when you edit an email template. Make sure to heed that warning and double-check your program email templates for errors.
Another thing to consider when integrating Pardot with other systems is the lag time between systems.
As an example, we once helped a client set up an event campaign utilizing Pardot, Salesforce, and an event RSVP tool. While testing the program before launch, we noticed that a small lag time between Salesforce and the RSVP tool resulted in prospects going down the wrong path in Pardot.
If you’ve set up an API connection between Pardot and another platform (in addition to Salesforce), make sure those systems have enough time to fire and communicate between steps.
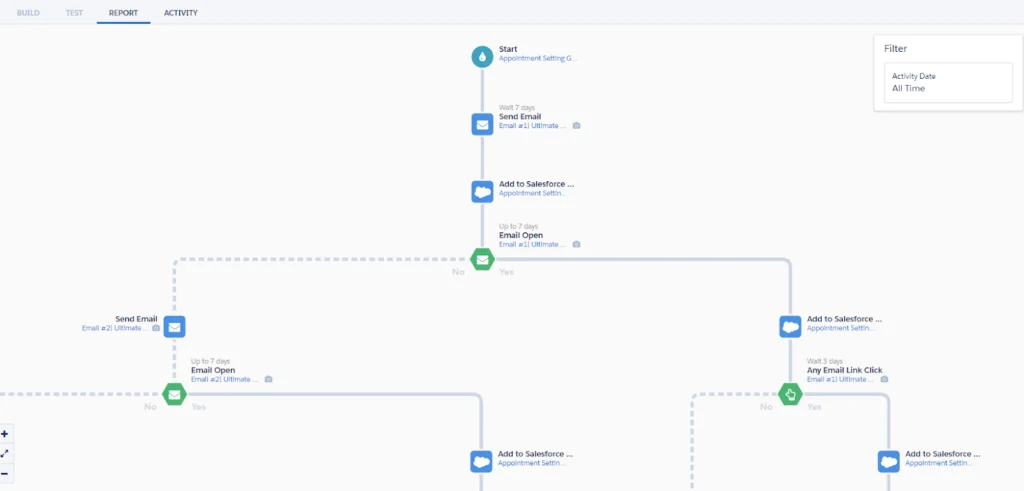
We wanted to reach these cold prospects every 3-7 days to warm them up to our service offerings, so we created two paths: 3-day wait and 7-day wait. Any time a prospect opened an email, we used that to indicate interest and moved them down the 3-day path.
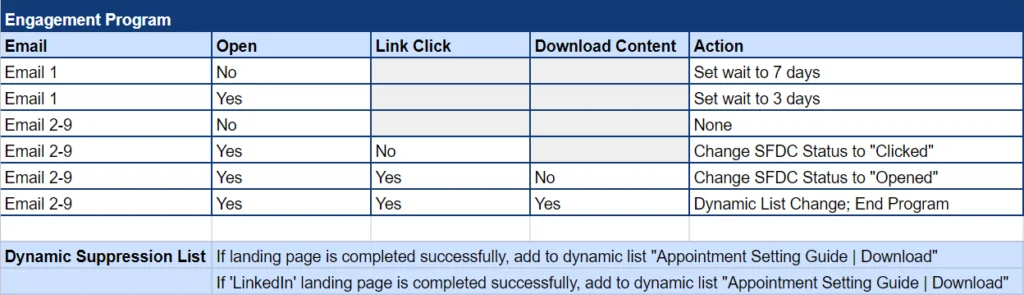
We used a few basic actions and wait steps to build out a 60-day email drip. Since we heavily utilize Salesforce, we also included an action that adds a status of “sent,” “opened,” or “clicked” to a Salesforce campaign.
This status gives our sales team visibility into how far each prospect made it in our engagement program and how interested they are in our services.
In the final phases, we tested out our program. Through the test function in Pardot, we actually identified some flaws in the logic.
One glaring flaw we caught was that prospects would only get the second email if they opened the first. This wasn’t right — we wanted them to receive the second email either way but just wait a few more days to send it.
This error is a prime example of how critical it is to check your work and get an extra set of eyes on your program. After correcting the errors, and auditing the program and email templates once again, we felt
confident about scheduling the Engagement Studio for the next morning.
Overall, the inbound campaign was a success. We were able to generate new MQLs from people who hadn’t heard of our company before and fill our sales pipeline with warm leads to call on.
We want to reiterate how powerful Pardot can be, acting as a marketing engine running continuously in the background. Follow these strategies and practices for your Engagement Studio programs, and you’ll continue to drive new marketing leads into your pipeline.
Don’t have time to read the full guide right now? Download the B2B Marketer’s Guide to Pardot to read at your convenience.