Through both default and custom fields in Pardot, we can save the critical pieces of information that will paint a better picture of our prospects. Pardot comes with your Salesforce default fields synced up out of the box. You only need to map your Salesforce custom fields.
Let’s take a closer look at these two types of fields:
- Default Fields: These are the out-of-the-box fields that come with Pardot. There are roughly 30 of these fields, and most of them are what you’d expect: company, phone, name, address, etc. Some fields are more specific to Pardot, such as bounce rates, last dates for particular actions, do not call, and do not email. You can edit these fields, but they’re typically best left alone unless you have a specific use case.
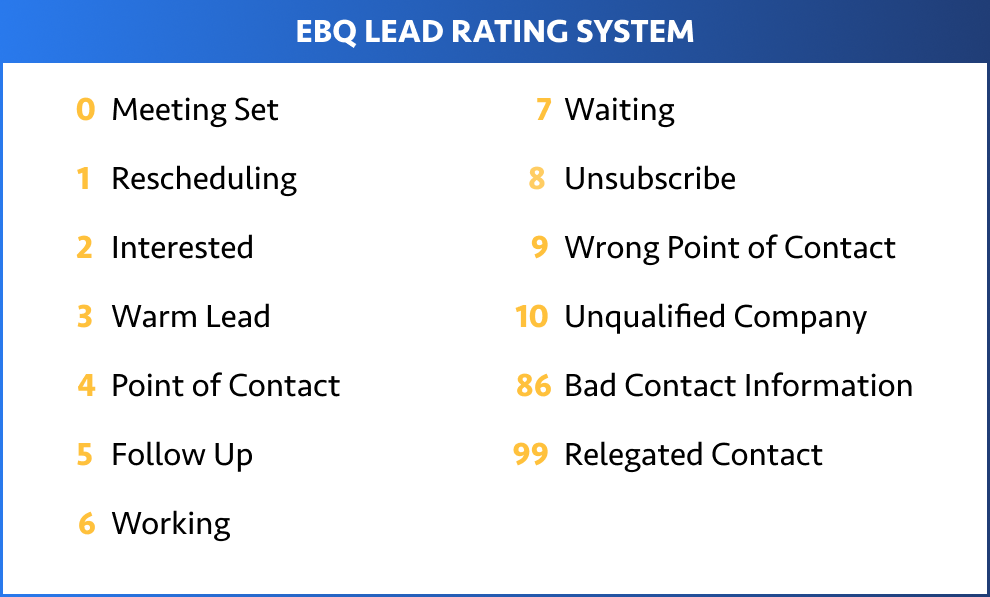
- Custom Fields: Custom fields are fields you create that are relevant to your particular business or processes. For example, we created a custom field for our own lead qualification system called EBQ Rating. This metric reflects where the prospect is in their buyer’s journey, and we can adjust the rating through automation rules.
Working with Pardot fields is relatively straightforward. There are a few pitfalls when it comes to specific field types. For instance, we recommend setting the data format for your phone number field to “text” instead of “number,” to ensure entries with punctuation are captured correctly.
Most of our pitfall examples are too specific to delve into in this guide. But keep in mind that fields tend to become more complicated when working with Salesforce.

B2B Marketer’s Guide to Pardot
Don’t have time to read the full guide right now? Download the B2B Marketer’s Guide to Pardot to read at your convenience.
Pardot-Salesforce field mapping
Mapping your custom fields from Salesforce to Pardot lets you segment your data into different targeted mailing lists as you would in Salesforce. Custom fields must be mapped over one-by-one manually.
What sync behavior should you set for your Pardot fields?
Sync behavior determines which platform’s value will be displayed when Pardot’s and Salesforce’s values differ. When mapping your custom and default fields, you have three options for configuring sync behavior:
- Use Pardot’s value
- Use Salesforce’s value
- Use the most recently updated record

1. “Use Pardot’s value” sync behavior
Use this function for fields that require Pardot’s marketing functions to override Salesforce. For example, we created a Pardot field for EBQ called “MQL Date,” which tells us when a prospect becomes a marketing-qualified lead in our system. Since this field can only be populated by Pardot, we make sure to use Pardot’s value instead of Salesforce.
This option is especially useful in Pardot forms for prospect fields like city, address, phone, or job title. This sync behavior ensures we have the most recent value entered for that field and the most up-to-date information on our prospects.
2. “Use Salesforce’s value” sync behavior
Use this sync behavior on fields for which you want Salesforce’s value to be the primary source. For example, we use this setting for our custom field called EBQ Comments, which we use to annotate our sales development cadence. The EBQ Comments should only be changed by Salesforce users on our sales team, so we make sure Pardot doesn’t override that data.
3. “Use the most recently updated record” sync behavior
This sync behavior is suitable when you have several sales and marketing efforts running in the background on a daily basis. When your sales and marketing teams are working together, you’ll want your platforms to show you the most up-to-date information.
At EBQ, we use this sync behavior for our custom field called EBQ Rating, which is our own take on modern lead qualification. Because we have marketing campaigns running alongside sales development outreach, we need our EBQ Rating field to be quickly and easily changed.

Now that your Pardot fields are all set up and mapped to Salesforce, we’ll move on to lead scoring and grading and how they help you qualify prospects automatically.


