Beginner’s Guide to Pardot: Pardot Setup & Admin


Daniel Wineland
Before you send your first email, you will need to go through each of these steps to ensure deliverability.
If you already have completed all these items during your initial setup, feel free to skip to the next chapter. If not, you will need to go ahead and install all these items before you can begin your Pardot campaigns.
Please note that it’s best if you have someone with coding savvy on hand to install these important Pardot setup items. Consider looping your webmaster and Salesforce admin into the conversations to ensure that you successfully complete all the necessary steps.
In order of sequence, you will need to:
- Add the Pardot tracking code
- Configure Your DNS and SPF records
- Install the tracker domain (CNAME alias)
- Create new users in Pardot

Beginner’s Guide to Pardot
Download our expert-created guide to begin your journey with Pardot.
Set up the Pardot tracking code
The tracking code is a simple piece of code that you copy and paste into each page of your website.
This allows you to track when visitors and prospects are landing on your website and bouncing between your different pages. Essentially, the tracking code cookies your prospects IP address and tracks their website visits.
To install this, copy the code from the campaign view in Pardot and paste it into your website’s HTML. Or if your website has a universal footer or header, you can add the code there, and it will propagate throughout the website. Otherwise, you will have to add the tracking code to every page individually.
Configure your DNS records for Pardot
The DNS records are essential to setting up emails in Pardot, so it’s critical that you set up the DNS and SPF records before you send out any Pardot emails.
Sending out emails through an unverified domain is going to hurt your delivery rates, and most of your emails will end up in the recipient’s spam folder. If you send out enough emails with unverified records, you run the risk of getting your IP address blacklisted.
If you have additional domains that you want to send emails from, click “Add New Domain” in the domain management page and repeat the above process for each domain.
Install the tracker domain (CNAME) in Pardot
All your Pardot files and landing pages will be hosted under go.pardot.com unless you create a CNAME record. Go.pardot.com is the out-of-the-box setting that all Pardot instances will have. In order to customize your Pardot domain with your current website, you will need to create a CNAME alias in Pardot and your DNS records.
For example: go.ebq.com
Remember, once you set up the CNAME alias, it’s recommended that you don’t change it. Since all your assets and content will be hosted under that CNAME, all the links will break if you change the CNAME.
We recommend that you stick with a CNAME unless you go through a major rebrand and have to change the web URL.
Create users in Pardot
Next, you will need to create users for each of your Pardot administrators and Sales team members. Pardot is broken into Sales and Marketing functions, with the marketing team owning the lionshare of the tool’s functionality.
There are 4 roles that we can choose:
Marketing Roles
- Administrator: Administrators have access to all settings, prospect data, and modules. We typically give this role to our Pardot power users (Marketing Managers and above), depending on the governance of your team.
- Marketing: Marketing users have control over prospect data and marketing modules — including creating lists, forms, landing pages, and sending list emails. Typically, your entry-level marketing roles will have this user role.
Sales Roles
- Sales Manager: Sales Managers have access to all prospect data and visitors but no marketing functionality. Sales Managers can send one-to-one emails to prospects but can’t send list emails. We typically would give this role to our Sales Managers or Sales Team leads to give them greater visibility.
- Sales: Sales users only have access to prospect management functionality. Sales users can send one-to-one emails to prospects but can’t send list emails. They can view, edit, and export the prospects assigned to them. Typically, an SDR and most of your Salesforce users will fit into this category.
Salesforce tip: Your Salesforce users will likely have either the Sales Manager or Sales role in Pardot. They may not even need to log in to Pardot, but it’s best practice to make sure that all your Salesforce users have a login in Pardot as we outlined above.
Each of your users will require the following on initial setup:
- First name
- Last name
- Role
- Time zone
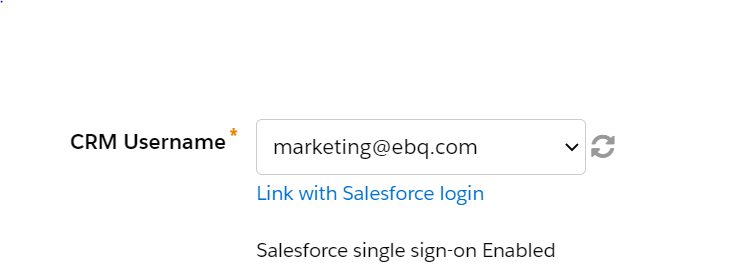
- CRM username
There are other fields that can be filled out on initial creation that allow you to customize your users even more. It is important to fill out the job title, URL, and text and HTML signatures because Pardot has the ability to pull in those pieces of information. We call those “variable tags,” and they can be accessed in the email feature of Pardot.
We will discuss variable tags at length in the email marketing section of the guide.
Examples of variable tags:
- Job title
- Phone
- URL
- Email signature (text/HTML)
User settings
Resetting user passwords every 90 days
Every 3 months, Pardot will ask your users to change their passwords. This is best practice to keep the passwords safe.
Send out activation email
This is how you will notify your users of a new account. If you don’t get the activation email, it will be impossible to ever log in to Pardot. However, it is possible to create a user without the activation email, then send the activation email at a later date. Many of your Salesforce users won’t need access to Pardot, so they won’t need to activate their account.
Time zone
You can set specific time zones for specific users within Pardot. We recommend you set the time zone to where that individual user is located. This is ideal for sales and marketing teams located in different regions of the country.
CRM username
This field allows you to connect with Salesforce CRM and appears after Salesforce CRM has been connected. This field gives you access to every license tied to your salesforce.com instance. Once you create your user, it will automatically link up to your salesforce.com user. This is a required step to allow users to sign into Pardot through Salesforce Single Sign On (SSO).

Tags
You can apply tags to your users to differentiate them. This is something that we don’t see that often at the user level but is more effectively used in content and prospect records.
Security limits
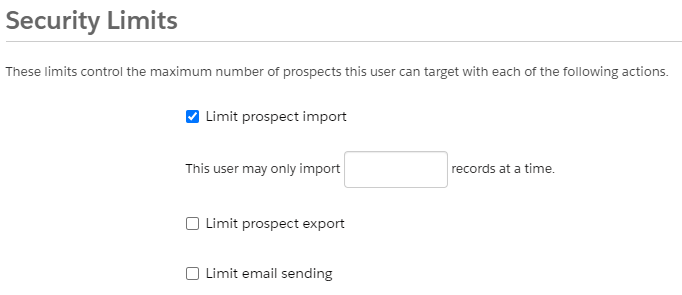
Here, we are able to enforce security limits on our Pardot users. Some limits include:
- Limit the prospect import
- Limit prospect export
- Limit email sending
We can set limitations by checking the box and entering limits within the text input.

Note: In Pardot, putting a “0” will be read as infinity. If you want to set the lowest record type, make sure you choose “1.
Email preferences
In this last step of creating users, we can set our email notification preferences. Please note that even though you can get notifications on quite a few Pardot functions, it’s best practice to only turn on notifications that are important to you.
Pardot allows notifications for:
- Send daily prospect activity emails (exclude tags)
- Send email when assigned
- Send daily prospect assignment emails
- Send daily visitor activity emails
- Send starred prospect activity alerts
- Send weekly search marketing email
- Send monthly inactive automation report email
