Pardot Engagement Studio is an intuitive marketing automation tool that is a more complete version of an email drip program. Engagement Studio allows you to send follow up emails, create a logic-based nurturing campaign, and test out scenarios to see how a prospect could navigate through the path.
It sounds complex, but it’s actually quite intuitive. Engagement Studio is a way to send emails to a list of prospects, see how they interact with them, then react to them differently based on how the recipient interacted with each email in the drip.
This is an automated string of messages that can change based on logic you create. This allows marketers to build automated programs that engage the prospect at every step of the buyer’s journey.

Beginner’s Guide to Pardot
Download our expert-created guide to begin your journey with Pardot.
Building an Engagement Program
To get started with Engagement Studio and get the most out of the program, follow these steps:
- Establish goals of the campaign
- Identify recipient and suppression lists
- Write the copy
- Develop drip logic
- Build the program actions, triggers, and rules
- Test and send
- Report
- Optimize
1. Establish goals of the campaign
First, you will want to establish goals for the campaign. Different engagement programs may have different goals, so make sure to define what success is for the campaign.
Examples of campaign objectives:
- Convert prospects to an opportunity
- Turn cold prospects into sales-qualified leads
When defining success for the campaign, try to come up with metric goals. This will allow you to easily recognize successful drips in the campaign from a reporting aspect.
Metric goals that you might track:
- Open rate
- Click-through rate
- Deliverability rate
- Number of conversions
Example: Let’s say we send out a large-scale engagement program that offers a long-form piece of content to a cold database.
- Objective: increase traffic to our content and website by having recipients click the link in our email.
- Metric Goals: email deliverability rate of 95%, an open rate of 25%, and a click-through rate of 4%.
2. Identify recipient lists and suppression lists
Now that you’ve defined the objective of your engagement program, you need to decide which prospects to target.
If your goal is to reconnect with past customers, then your recipient lists would be static or dynamic lists of prospects who have purchased your products/services in the past.
Using a dynamic list:
As we learned before, dynamic lists constantly run in the background of Pardot. These constantly changing lists add prospects that fit the criteria you set and remove the ones that don’t. Dynamic lists are perfect for a completely automated engagement campaign, such as a welcome series. But, if you use a dynamic list in your engagement program, make sure to use language in the email that can apply at any time.
As prospects are added to the dynamic list, they will also be added to the drip campaign.
Let’s say you have a dynamic list called “past customers” that adds a prospect two weeks after they convert to a closed deal. If this dynamic list is added to the recipient list of your engagement program, newly added prospects will also be sent the email from the engagement campaign two weeks after their purchase.
Using a static list:
As we already learned, static lists must add or remove prospects manually. So, if you add a static list to an engagement program, it will only email the people on the list at that time and anyone you manually add later.
Use cases:
- You are testing a campaign before you let it run automatically.
- You have a one-off campaign to promote a limited time sale.
Suppression lists:
Suppression lists are used to remove prospects from the email recipient lists. They take precedence over your recipient lists and can be static or dynamic.
Example: You already sent a group of prospects an email last week and don’t want anyone from that campaign to receive another email from you.
- Upload the recipient list from last week’s campaign to the suppression list of the current campaign.
- If a prospect is on both your suppression list and recipient list, they will not receive the email.
This is helpful when there are prospects on your recipient lists that you don’t want receiving your email and don’t want to create an entire new list.
3. Write the copy
In this step, you will write the content of your emails if you have not done so already. In some cases, your email templates may already exist and all you have to do is clone or repurpose them for a new campaign. Some people even create the drip logic before writing your emails.
It is best practice to come up with your objective, goals, and target audience before writing a marketing message. To learn more about email marketing tips and best practices, visit the previous section on B2B email marketing.
4. Develop drip logic
Now that you have created your content, next you will want to develop your workflow. Pardot’s Engagement Studio has an intuitive logic builder to build out your email campaign. In this drag and drop builder, you can create a visual workflow of how your drip campaign will play out.
Keep your goals/objectives in mind when planning your drip logic and remember to put yourself in the shoes of the prospects receiving the email.
Questions to consider:
- What happens next if the email is opened?
- What happens next if the email is not opened?
- What if they click the link inside?
Make sure to plan out every step of the drip campaign from start to finish. Plan out scenarios for when the campaign works to accomplish your goal and for when the campaign does not. Weigh all possibilities so you can come up with the most efficient way to nurture your prospects through the customer journey.
5. Build the Engagement Studio
By now, you should have a good idea of how you want the engagement campaign to work and have all assets prepared to go live (email templates, prospect lists, and any actions you want to trigger). Now, you will build out your first engagement studio campaign.
There are 3 Pardot elements you can add to an engagement program: an action, a trigger, and/or a rule. You can add as many of them as you like along the drip campaign.
Action — Do something
An action tells Engagement Studio to do something to the prospect, like send an email today, add them to a list, or change their Pardot score. Other examples include:
- Send an email in X days
- Change one of their default/custom field values
- Assign to user
Trigger — Look for something
A trigger is used to tell Engagement Studio to listen for something. Did the prospect interact with your content or email in the way you hoped they would?
- Did they open the email?
- Did they click the link inside the email?
- Did they download a file?
- Did they fill out the form?
- Did they click on a custom redirect?
Rule — Check something
A rule is used to check the prospect database to see if they match certain criteria.
For example:
- Do they have a Pardot score of 50 or higher?
- Are they assigned to the user: John?
- Do they belong to a certain list?
- Do they have ____ in their custom field?
- Do they have a certain tag?
Both triggers and rules will provide you with a yes or no pathway that alters the structure of your engagement program.
For example: Did they open the email?
- If yes, then send email #2 in 3 days
- If no, then resend email #1 in 3 days with a different subject line
A few tips to consider:
- You can only set triggers to wait up to a whole number e.g. 1, 2, 3, etc. (i.e. you can’t set half days)
- Only send emails during business hours and business days. If a holiday is coming up, keep that in mind when you are building your engagement program.
- You can only use an email template once during an engagement program. This default setting can be turned off by an administrator.
- Your Engagement Studio program doesn’t have to be complete when you send.
- By default, prospects can only enter an engagement program once. A recent update allows prospects to enter multiple times, but this also needs to be changed by an administrator.
6. Test and send
Pardot has a testing feature in Engagement Studio that allows you to walk through how a prospect may navigate your drip campaign. It also will tell you how long the engagement program will last. Go through each pathway to get an idea of how it will work and see if there is room to make the customer journey more efficient.
7. Report
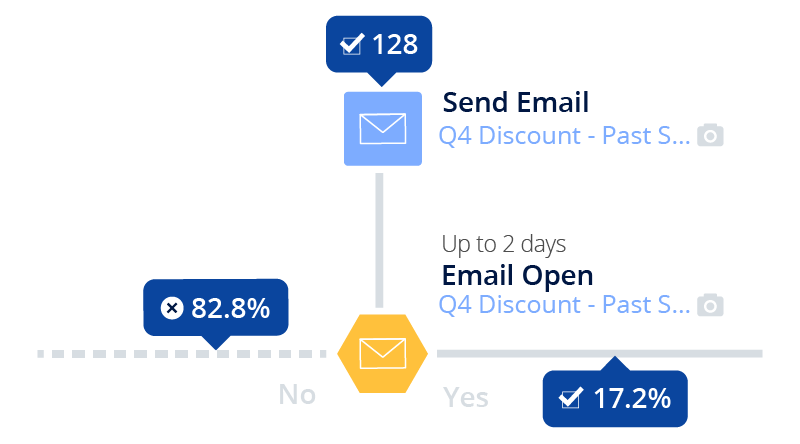
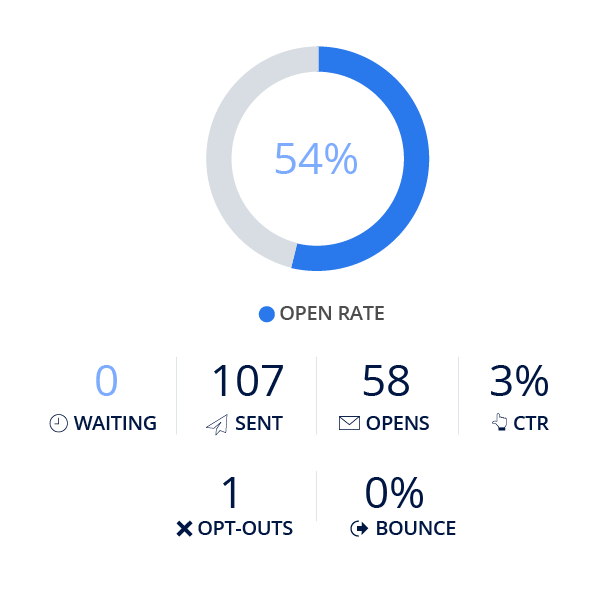
The report tab in the Engagement Studio provides in-depth insight into how successful your engagement program has been thus far. It’s a good way to check your metric goals against the real data to see what percentage of prospects have navigated down your paths, the open rate for specific emails, click-throughs to your links, etc.

In the screenshot above, you can see that we sent an email to 128 people:
- 82.8% did not open it
- 17.2% opened it
Analyzing the path distribution can help you to optimize your program. You can also select a specific email if you want to see an in-depth look at more email marketing metrics:

Reporting is an important step in developing a high-converting engagement program and allows you to gain insight on how to improve future campaigns.
8. Optimize
The final step in creating a successful engagement program in Engagement Studio is optimization. There is always room to improve, so keep a close eye on reporting and test out different scenarios. You never know how much something simple like a different subject line in your emails can help.
If your campaigns are not reaching your goals, then you may want to reevaluate. Don’t be married to the same email templates and keep an eye out for when prospects lose interest in a nurturing campaign. See if you can pinpoint a specific email or spot in the workflow that can be improved.
Conclusion
Engagement Studio is the most powerful tool in Pardot and can only be mastered through trial, error, and experience. Feel free to test different emails, actions, and drip logics to find out what works best for your business.
In the following section, we will cover email marketing metrics that can help you improve your engagement programs as well as some basic analytics and reporting best practices.


