SEO Basics Checklist for Blog Posts: How to Improve Your Ranking and Surpass Your Competitors [+ PDF]


Ben Darling
This post was originally published in May 2020 and has been updated for accuracy and comprehensiveness.
Since 2020, Google has been releasing regular Core Updates that change how Google ranks search results. This means that the search algorithm has been incredibly turbulent, so you need to prioritize your site’s SEO health now more than ever. This SEO Basics Checklist will guide you through how to make sure each site element is technically optimized for your best chance of ranking.
In this guide, we’ll walk you through
Let’s first answer the question we hear the most: do you really need SEO?
Download the SEO Content Creation Checklist for Blog Posts
Create an SEO-researched blog post that increases search visibility by downloading our free interactive checklist.
“Do I need SEO for my website?”
The short answer is “yes” because it allows you to get discovered by people who are actively looking for a solution like yours.
However, it’s important to note that SEO is a marathon and not a sprint; you should look into leveraging paid search specialists to help accelerate your content goals. We will take a deep dive into the difference between the two later in this post.
EBQ Tip: Google Ads is one of the most commonly used search engine advertising platforms. If you would like to get started, check out our post “B2B Google Ads Basics to Help You Get Started with PPC Campaigns.”
What is SEO?
SEO — or search engine optimization — is the process of bettering your website to organically rank higher within search engines (such as Google, Yahoo, and DuckDuckGo). Unlike paid search, you are not directly paying the search engines to rank higher on their pages. While there are a lot of search engines on the market, Google is by far the most popular search engine to this day.
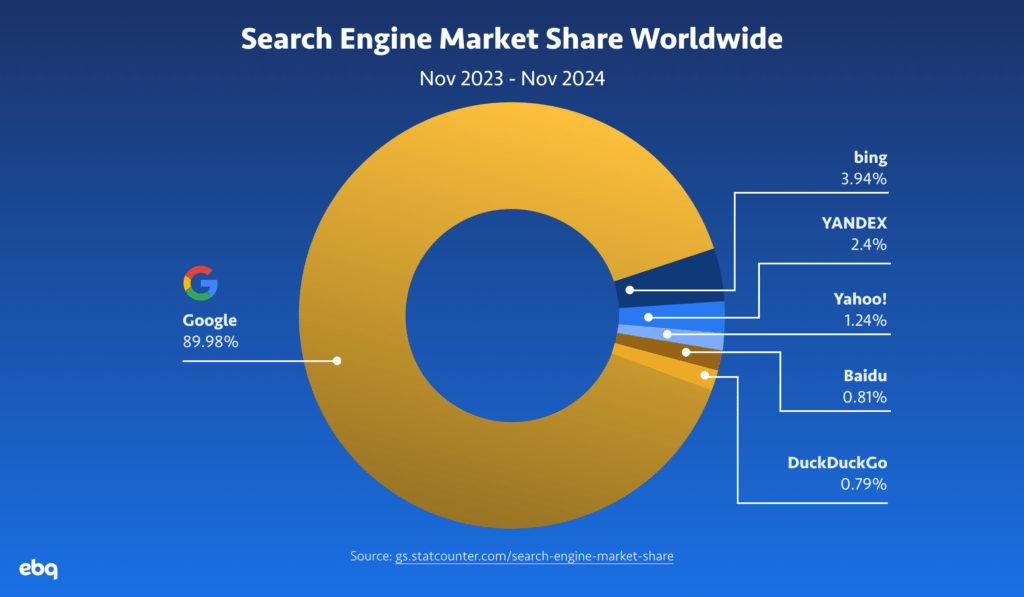
That’s why the majority of SEO resources you will encounter will focus primarily on Google — including this checklist! So how do you rank higher?
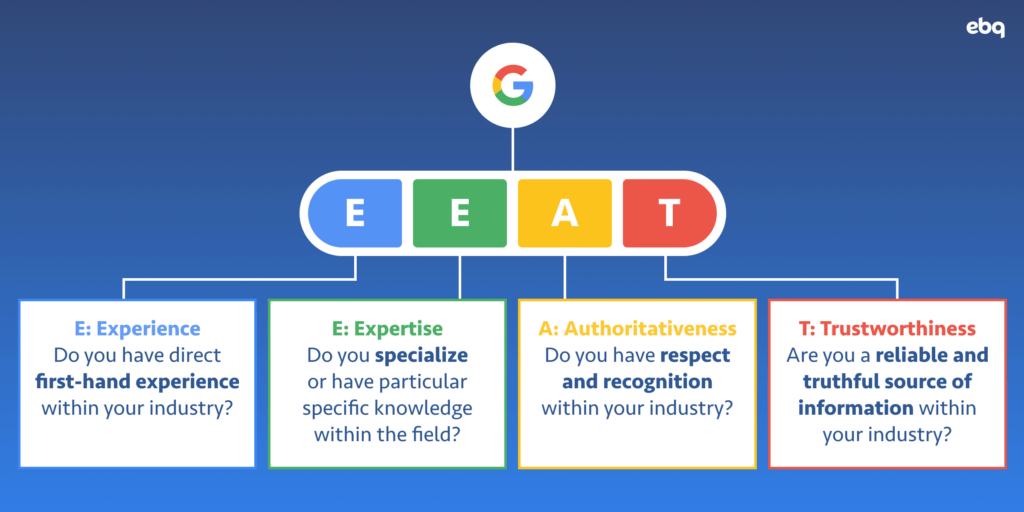
You rank higher by showcasing expertise and relevance:
- Expertise: Are you a credible source for your target audience?
- Relevance: Did you directly answer the searcher’s query?
For Google, this is known as E-E-A-T. You can break it down like this:
EBQ Tip: While Domain Authority is not a Google search metric, it is developed by Moz and estimates how likely a website will rank high within the search engine results pages (SERPs). The higher the score, the more likely your website will rank for your targeted and competitive keywords. We discuss how to increase your domain authority in another post.
What is the difference between SEO and SEM?
Think of SEM — or search engine marketing — as an umbrella term that utilizes both organic and paid search efforts. Your overall goal in search marketing is to rank high in SERPs and increase relevant site traffic.
As mentioned earlier, SEO is a marathon and not a sprint. That’s why many digital marketers often recommend businesses to also leverage paid search advertising. That way, you can still funnel relevant traffic to your target landing pages without having to wait for search engines to “see” value in your content to help increase your overall ranking.
As a general rule of thumb, we often tell clients that SEO takes 3-6 months to see results. We will discuss the 2 types of SEO elements that will help you rank well.

Subscribe to EBQ's Bimonthly Newsletter
Subscribe to EBQ's Bimonthly Newsletter
The SEO Basics Explained
Now, we’ll break down how Google ranks your content and what are some of the elements that they use to assess your site.
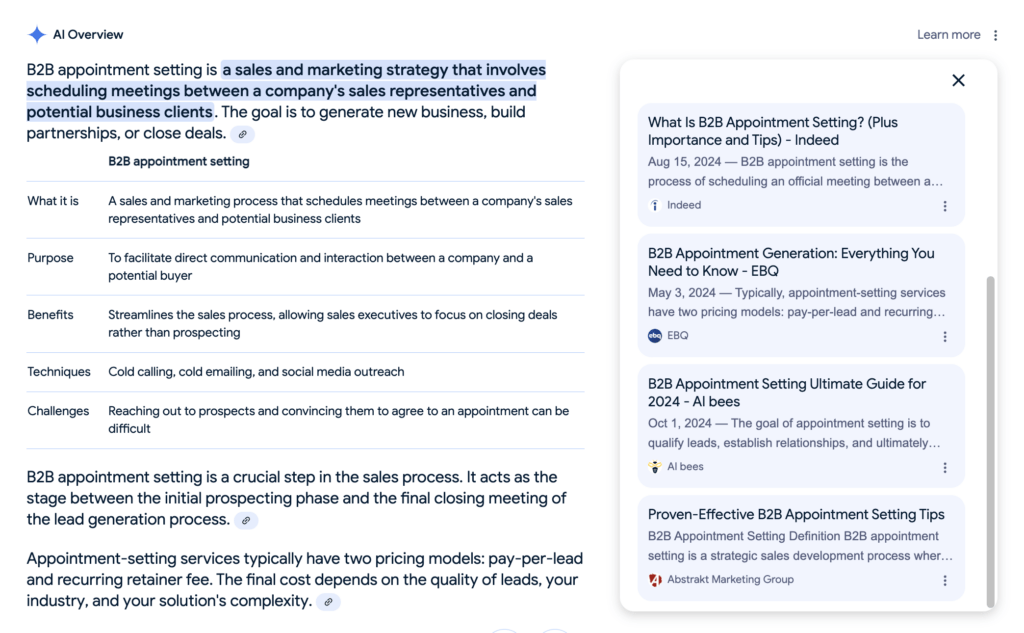
In short, you first need to publish your content on a website. From there, Googlebots — also known as spiders — crawl through your site to understand what your page is about. Google then indexes these pages under relevant search terms.
Your content will then appear on a search results page if it appears to answer a relevant search query.
EBQ Tip: You do not have to wait for Googlebots to “stumble” upon your site. Instead, you can manually request Google to crawl — or even recrawl — certain pages. That way, you do not have to wait as long for initial results.
Broadly speaking, there are two types of SEO elements: on-page and off-page.
What are on-page SEO elements?
On-page SEO elements are factors that you can control on your website to influence search results. Typically, this takes a look at your content and site health to ensure you are creating an overall positive site experience for your visitors.
If you are in the B2B marketing space long enough, you’ll hear that “content is king.” It generally means that you need to prioritize creating high-quality content that provides value to your readers in order to rank well.
Some other on-page SEO elements include:
- Title tag: This is how the Google search results will display your landing page. Think of this as the “title” Google SERPs list your landing page as; while it does not technically have a character limit, we recommend keeping it to 50-60 characters.
- Meta descriptions: This is the little paragraph that goes under each search result that provides extra context on what your page is about. You should keep meta descriptions between 120-160 characters.
- Header tag: These are the actual headings and subheadings that are on the site. We will discuss the heading hierarchy later in this post.
- URL: This is located where the content or media lives on your website. You should make URLs legible by separating each word with an en dash (-).
- SCHEMA markup: This is a set of tags created on the backend of a website that tells search engines what certain words, phrases, and numbers mean. For example, you would want to tag addresses and phone numbers on your site.
EBQ Tip: Some marketers label the elements listed above as “technical SEO elements.” Web developers are generally responsible for correctly marking up your content in HTML code.
Are you struggling to write content that ranks? Our content marketers could be the perfect partners for you. We specialize in leveraging our search tools and understanding your audience to write both long and short-form content that resonates with your prospects.
What are off-page SEO elements?
Off-page SEO elements are factors you can try to influence outside of your website to better your search engine rankings. Many marketers consider manipulating off-page SEO elements as more difficult than on-page elements — but it is still equally as important to make note of.
Some examples of off-page SEO elements include:
- Backlinks: These are the links that are coming to your site from an external source.
- Review sites: These websites are where people can review you on a third-party platform — such as Clutch.co.
- Social signals: This is how people perceive your brand and share their experiences over social media.
EBQ Tip: Some links are considered “toxic,” which means they are spammy links that provide little to no value to your readers. In the past, you could try to pay external sites to link back to your site to artificially boost your off-page SEO. That said, Google can punish your site by de-ranking your current and future content.
Nonetheless, some spammy bloggers may still try to link to your site. You can tell Google to ignore these links — also known as disavowing links.
SEO Content Creation Checklist
Here are our 7 steps to creating high-quality blog content:
Download the SEO Content Creation Checklist for Blog Posts
Create an SEO-researched blog post that increases search visibility by downloading our free interactive checklist.
1. Identify your content goals
Like with other aspects of business, your first goal is to figure out what you are trying to get out of your content.
Some common examples of content goals include:
- To improve your search ranking positioning
- To generate marketing-qualified leads (MQLs)
- To boost brand awareness
- To increase site traffic
Your content goals will ultimately influence how you write your content. We will talk more about creating effective call-to-actions (CTAs) that will help you get closer to your content goals in Step 7.
2. Perform keyword research
Keyword research is the process of finding relevant keywords — also known as search terms — that your prospects would use that will lead them to your website.
We break it down into a step-by-step process in Chapter 4 of our B2B Marketing Strategy Framework Guide.
EBQ Tip: Earlier, we mentioned that search volatility has been high lately. That’s why it’s more important than ever to understand search intent and how to create relevant content around it.
We break down the four search intents (informational, navigational, commercial, and transactional) in “How to Do Keyword Research: Tips, Tricks, and Insights.”
3. Organize keywords into appropriate headers
Now, go through your keyword list and identify strong keyword contenders. The best keywords strike a balance between low search competitiveness, high search volume, and strong search intent.
From there, you should organize your keywords into an outline. Each keyword should be separated into one title and several subheadings. This is often known as heading hierarchy, which will help readers understand the flow of your content and search engines to quickly crawl through your post.
					<h1>Blog SEO Checklist: How to Optimize and Rank High on SERPs</h1>
<h2>How to Create a Keyword Marketing Strategy in 3 Steps</h2>
<h3>1. Build a list</h3>
We mentioned this earlier in the post, but this is where header tags come into play:
- Heading 1 (H1): An H1, labeled by the h1 tag, is the main title of your blog post. There should only ever be one h1 in a post containing the primary keyword you gathered from your research.
- Heading 2 (h2): You can use h2 tags to break up the sections of each blog post. Using 2-3 h2 tags in a blog post is recommended, and if you can, use some keywords you found in your research. The h2 tags allow the search engine to see that it’s a new section of content.
- Heading 3 (h3): Think of h3 headings as subheadings to your h2 tags. They tell search engines that the content includes information relating to the h2 title that it sits under.
4. Write!
Now comes the fun part: writing! Your goal here is to write with as much authority and relevance as possible.
Here are a few of our quick tips for writing an SEO-optimized content:
- Make sure you write over 300 words per page. Otherwise, it is considered thin content and will actively hurt your site rankings
- When linking to your sources or other pages, use descriptive anchor texts (i.e. not “Click here” or “Read more”). This helps spiders understand how the linked pages are related to one another.
- Do not rely on AI to write for you, as Google has been actively punishing AI content. You need to sound as conversational and approachable as possible.
- Only use one h1. Multiple h1s will confuse search engines, which can be detrimental to your search ranking.
- Spell check and fact check. Without either of these, Googlebots may assume you are writing spammy content and actively de-rank you.
- Break up your writing into smaller sections. Utilize bulleted lists, quotes, and other graphical elements to make your content more digestible.
- Answer the question straightforwardly. This improves your chances of ranking in featured snippets.
5. Add internal and outbound links
Linking your blog post is a great way to show readers that you are backing up what you’re saying with additional resources. It also creates an opportunity to link your blog post to a product or solution page if it relates to the topic of your blog. There are two ways you can use linking to your advantage.
Internal links allow search engines to understand the connection between your different pages, what your site is about, and the relevancy of the keywords you’re targeting. They will also lead readers to more resources you’ve created, increasing their interaction with your website.
Internal links also provide an opportunity for topic clusters. A topic cluster is a group of related pages on your site, with each containing one main page covering the overview of the topic. You can connect all of these pages to create a topic cluster with internal links improving your SEO and topical authority.
External links show readers and search engines that you are backing up your claims with research outside of your company. These links will contribute domain authority from the external site to your site.
EBQ Tip: Generally speaking, you should be scattering 3-5 internal and outbound links every ~1000 words. You should also only provide one link in a single paragraph; otherwise, it will be seen as spam by Googlebots.
If you have to link to a direct competitor, ask your web developers to utilize a “nofollow” tag. This tells Google that you do not want to “pass” your authority over to the external page.
6. Add high-quality images
Have you ever stumbled upon a blog post that utilized blurry stock images that add very little value to your reading experience? Did you want to trust that source?
Poorly optimized images are an indicator for Google that your site is poorly designed. Remember: Google’s goal is to answer the searcher’s query quickly and efficiently. They’re incentivized to quickly serve up high-quality websites that searchers feel like they can trust.
We’ve mentioned earlier that utilizing graphics is a great way to break up a lengthy educational post. That said, you need to properly optimize your images for the best results.
Some image elements to optimize:
- File names: The image file name should summarize what is pictured. Use primary or secondary keywords relevant to the image, but keep it to one or two keywords to avoid keyword stuffing. Typically, a file name should be no more than five words.
- Alt text: Alt text is important to make your blog accessible to anyone who may use screen readers. This text appears when you hover the mouse over the image, helping visitors understand its purpose. Alt text is another way for search engines to comprehend your content and will help your post rank in image searches.
- Image size: Keeping your graphic files small without compromising the quality will help your page load. The image file should be sized at the actual width and height they appear on your page.
- WebP format: All your images should be in WebP format for optimized load and page speed.
Remember that all original graphics should be in your brand style and colors, and any graphics pulled from external sites should always have a linked source. If you’re establishing a new brand or need help creating visuals that align with your goals, contact our visual design specialists for help.
7. Add CTAs
After writing your content, ask yourself: what is the next step I would like the reader to take after reading my work?
From there, you should add a relevant call to action that encourages readers to take that next step.
For example, if your content goal is to gain more MQLs, then you should have a lead form somewhere on your post to capture their contact information.
TLDR; How do I do SEO for my website?
The short answer is to follow our Content Creation Checklist to create a technically optimized blog post. The SEO process, however, requires the expertise of marketing experts.
Our comprehensive Digital Marketing Solution Services provide businesses with content writing, graphic design, and web development resources to help improve your overall UX/UI. Unlike other marketing agencies, we provide maximum flexibility with our monthly contracts that allow you to pivot your marketing resources quickly.
About the Author:
Ben is a Business Consultant at EBQ with over 13 years of experience in Demand Generation. He has played an active role in hundreds of projects consulting companies across different industries, maturities, and tech stacks to increase brand visibility.